Configure your Windbird
Thank you for purchasing a Windbird!
We'll configure it together...
Before we continue, here are a few tips:
- Please don't rush
- Follow all the steps
- Don't skip compass calibration!!!
- If you had a Pioupiou before, forget it. Windbird has many differences
- If in doubt, email contact@windbird.com
The presentation video: https://www.youtube.com/watch?v=jQ60AGnvba4
In the box
Windbird is ready to use:
- Batteries are included
- The network is configured
- The contract is active
Don't open it, or you may void the warranty.
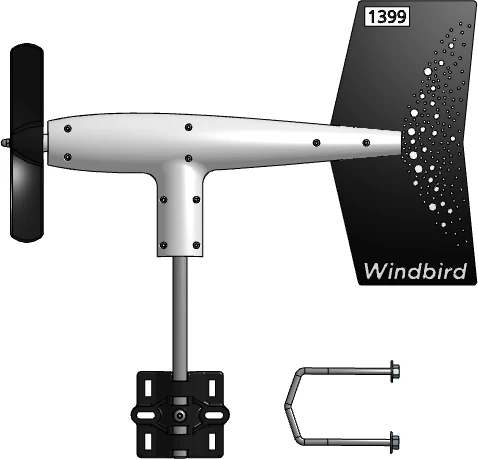
Mounting hardware
The mounting bracket is used to secure the WindBird to a mast. Fix it as vertically as possible.
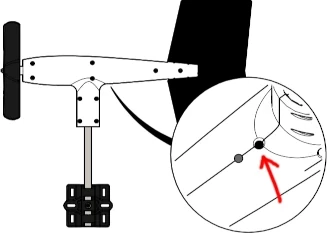
Unique number
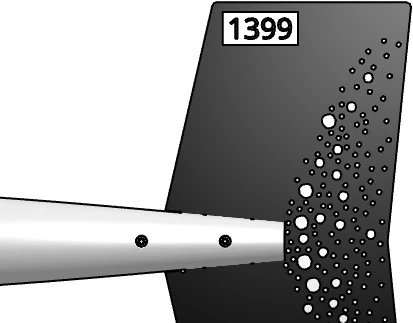
Your Windbird has a unique serial number. You need to remember this number.
It will be useful to check measurements, request support or perform maintenance.
Turning the WindBird on and off
Startup
Press the button briefly with a thin object or pen.
Watch the LED's reaction.
If it stays on (~15 s):
- The device lights up and sends an initial message.
- When the LED goes out, the start-up process is complete. Windbird is now operational.
- It will then perform a GPS localization for approximately 45 seconds.
- The first measurements will be received about 10 minutes later.
The LED will then always remain off during operation.
If it flashes slowly and continuously:
The capacitor is being charged. This may take a few minutes.
Once the LED stops flashing, start-up continues as described above.
Compass calibration
Unlike other anemometers, Windbird does not need to be oriented with respect to north. It includes an electronic compass.
However, it is absolutely necessary to calibrate Windbird's compass.
The earth's magnetic field varies at each location. For this reason, calibration must be carried out at each installation site, just before mounting Windbird on its mast.
You'll need to calibrate your Windbird's compass.
If you were familiar with the Pioupiou device, forget it. Windbird's calibration procedure is different.
How to calibrate?
- Make sure Windbird is already switched on.
- Continue to press the button for ~10 seconds, until the LED blinks.
First, let's calibrate the 2 vertical positions:
- Hold the WindBird vertically. Rotate the WindBird around its axis, for a single turn.
- Hold it upside down. Rotate the WindBird (still one turn).
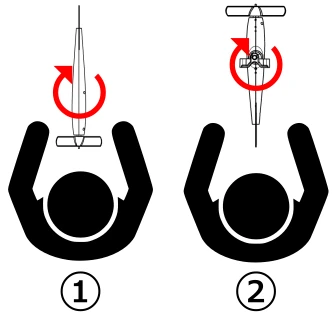
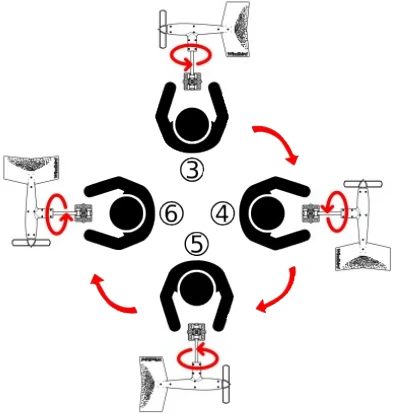
Next, we'll calibrate the 4 horizontal positions:
- Hold it horizontally in front of you. Rotate the WindBird.
- Turn your body 90° to your right. Rotate the WindBird.
Now check the LED. If it's still on, you need more samples. Repeat the movements until the LED goes out.
Once calibration is complete, the LED will go out for 3 seconds, then the WindBird will restart.
Stop / Storage
Press the button again.
The LED flashes rapidly 5 times and then gradually goes out.
The Windbird is now switched off.
Consult measurements
Measurements are visible on the web page openwindmap.org/{device number}
Example: If your number is 1399, as in the previous photo, visit https://openwindmap.org/1399
You can also easily access it from https://openwindmap.org
`